|
|
 |
|
|
|
|
The building is very long (87 feet) and it was impossible to get a good “before” photograph of it’s entire length with my SLR film camera. If it weren’t for a friend and his digital camera, I’m afraid that I may not have had any photographs to share! Starting with what is on the other side of the door in this picture, I will walk you through the building from end to end to help you understand the construction. That door takes you to the little semicircular copper-roofed room which is visible on the original exterior photograph. I currently refer to it the extension gallery, which in actuality is the main entrance to the building. Since we will not be working on this room for quite a while, I have not included any photos of it’s interior. As the renovation progresses into that room, new pictures will appear along with some rather fascinating text. Below we are standing in my painting studio, and you are looking at one of the three natural stone walls that will remain exposed. All walls are 18 inches thick and every stone was gathered from local farm fields and brought to the Ringling worksite by horse or oxen cart. There are three small windows in this wall, but because of the pallet racks filled with supplies only one is visible. The sun tracks across this side of the building throughout the year, which in turn distributes good light and creates a nice warm interior glow. 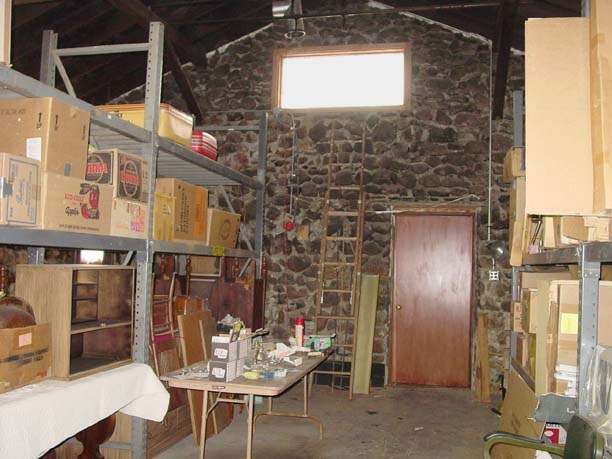 As we turn around and back up a bit, you can see the wall that is being erected to close off my painting area. If you look very carefully through the studs, you can see all the way to the other end of the building. In the peaked area and on the other side of the recently installed drywall, is one of the original trusses.  Standing in the same place, but looking up, you can see another truss and the high rustic ceiling. Insulating from the roof up will prevent heat loss and allow for the natural old wood beams to remain exposed. Ceiling fans will eventually be installed to force warm air down for additional comfort below.  We have now moved into the next section or gallery area and are looking back toward my painting studio. It is difficult to describe, but doors leading into this center section will not be visible. There are actually two walls here that you are seeing. One wall reaches the ceiling, which has been partially installed and visible behind the truss, and the other has been designed as a short 8’6” floating partition. This was done to maximize wall space and to eliminate visual interruptions within the gallery. Back when this building was built, symmetry was often a design characteristic, so I have chosen to reflect this motif in my design of the gallery. In other words, the same configuration of walls that is happening on this side repeats itself in a mirror image on the opposite side.  If we move a little closer to the floating wall studs and turn slightly to our left, which faces the rear of the building, you can see the height of the floating partition. It now abuts another wall. This jut out is actually a little room that I created to house one of the new furnaces, which already sits inside. This furnace room is not square, but has an angled wall that faces toward the center of the gallery. This design will allow artwork on this wall, along with all other artwork to be seen in one easy glance. The stone wall along the back will remain exposed.  Remaining in the gallery area, but now turned to your right, you face the front (street) side of the building and the great arch. To gain a sense for size, a compact car can be driven through the doorway within the arch! The stone and arch of this impressive wall will not be covered and will remain as you see it. The lighting we have planned will make it even more dramatic! My husband would love to replace the entire arch with plate glass! But being situated so close to the road and at the rate that we have seen the snow plows go by, all it would take would be one stone and we’d have crackled glass instead! I can't imagine the cost for such an idea, however it is an interesting one! A very dear and long
time friend of mine inherited a collection of Ringling Brothers
circus posters that were reprinted in 1970 from the originals.
These reproductions were produced for Ringling Brothers’
100th Birthday. In the back of my mind I’m thinking that
this collection might look attractive on this wall. With very
soft and  Yours truly discussing the aspects of lighting with the electrician who will be doing the job from Gene’s Electric. In the center is my husband Arno, and standing next to him with his arm around one of the new studs is our dear and super multi-talented friend Sandy. Gene who owns Gene’s Electric happens to be the one taking this picture and is another super talented friend! These three buddies are life long friends and the men who are making almost everything HAPPEN! Without my husband, Sandy or Gene, I’m afraid my art studio would just be a dream. Because of them it is now becoming a reality!  We are now at the far end of the building and this is the way it looked before anything was done. The bathroom is to the right and can be seen in the next photo.  There were actually two bathrooms to accommodate the public when the building served as a small theater. Since it was impossible to move the plumbing, a single bathroom and a small kitchenette will be located in this area.  The water tank for the old bathrooms was located in a crawl space above them. Before tearing down the old walls it had to be temporarily suspended and will eventually rest on a new attic floor alongside a new hot water heater. Since this is the utility section of the building and in order to conserve some heat it is not important to leave the beams exposed in this area.  Between
the photo above and the one below there was a lot of laborious
work done before we could frame out the new bathroom floor. Unfortunately
I don't have pictures, and they would have been good ones! There
was a chimney that served no purpose and had to come down. Next we had to pour a new floor for the bathroom because the concrete was not level in that area. In order for cement to adhere properly it should be poured on a clean surface so that it can bond to the existing concrete. Creating that bond was impossible -- the floor had been painted! Arno tried everything to get the paint off, but it wouldn't lift no matter what! The only solution was for the two of us to sit on the floor with a hammer and chisel and chip away the paint inch by inch! The framework for the bathroom floor -- ready for cement.  Bathroom floor poured, tiles laid, grout in and wall studs up! You'll notice that there appears to be a space behind the bath. That area will be for an all purpose sink in the L shaped kitchenette.  Here you are standing in the main framing room looking down the hall and facing the end wall with an emergency exit. The handicapped accessible bathroom, kitchenette and framing room 2 are on your right. Furnace 2 and tool room are on your left.  To see the most recent renovation photos, close this page and click on Interior Renovation - January 2007. |